Kubernetes Networking: Pod and Service Networking
Understand Pod and Service Networking
Welcome back to my Kubernetes Networking series! In the first article, we covered the fundamentals of Kubernetes networking, including the basic components and the overall networking model. Now, we'll take a look into how Pods and Services communicate within a Kubernetes cluster.
Series Outline:
- Fundamentals of Kubernetes Networking
- Understand Pod and Service Networking
- Network Security with Policies and Ingress Controllers [In Progress]
- Service Meshes and Traffic Management in Kubernetes [In Progress]
- Kubernetes Networking Best Practices and Future Trends [In Progress]
Table of Contents
- Recap of the Kubernetes Networking Model
- Pod Networking in Depth
- Understanding Kubernetes Services
- 3.1 Service Types Explained
- 3.1.1 ClusterIP
- 3.1.2 NodePort
- 3.1.3 LoadBalancer
- 3.1.4 Headless Services
- 3.2 Service Discovery Mechanisms
- 3.1 Service Types Explained
- Traffic Routing and Load Balancing
- Practical Examples
- Conclusion
1. Recap of the Kubernetes Networking Model
Let's briefly recap the key principles of the Kubernetes networking model:
- Flat Network Structure: Every Pod in the cluster can communicate with every other Pod without Network Address Translation (NAT).
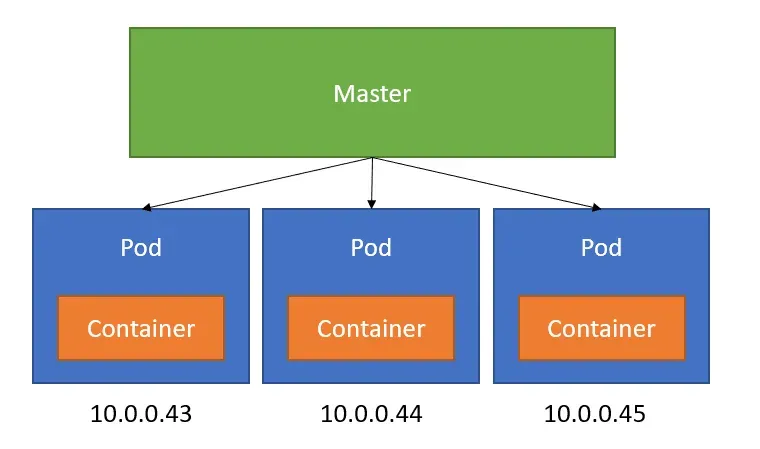
- IP-per-Pod: Each Pod gets its own unique IP address within the cluster.
- Consistent IP Addressing: The IP a Pod sees itself as is the same IP others use to reach it.
These principles simplify application development by abstracting away the underlying network complexities.
2. Pod Networking

2.1 Pod IP Allocation
When a Pod is created, it is assigned an IP address that allows it to communicate with other network entities in the cluster.
- IPAM (IP Address Management): The Container Network Interface (CNI) plugin handles IP address allocation.
- IP Range: The cluster has a predefined CIDR range for Pod IP addresses, configured at the time of cluster creation.
- Per-Node IP Pools: Each Node may have a subset of IPs allocated to it to assign to the Pods it hosts.
Example:
If your cluster Pod CIDR is 10.244.0.0/16, Node 1 might be assigned 10.244.1.0/24, and Node 2 10.244.2.0/24. Pods on Node 1 get IPs like 10.244.1.5, 10.244.1.6, and so on.
2.2 Pod Network Namespace
- Isolation: Each Pod runs in its own network namespace, providing isolation from other Pods.
- Shared by Containers in a Pod: Containers within the same Pod share the network namespace, IP address, and network interfaces.
- Loopback Communication: Containers in a Pod communicate over
localhost.
2.3 Inter-Pod Communication
Pods communicate with each other using their IP addresses over the cluster network.
-
Same Node Communication:
- Bridge Network: On the same Node, Pods communicate via a virtual bridge (e.g.,
cbr0). - Efficient Routing: Packets are switched locally without leaving the host.
- Bridge Network: On the same Node, Pods communicate via a virtual bridge (e.g.,
-
Cross-Node Communication:
- Routing Between Nodes: The cluster network routes packets between Nodes.
- CNI Plugins Role: The CNI plugin sets up the necessary routes and network interfaces (e.g., VXLAN tunnels, BGP peering).
Key Points:
- No NAT: Direct communication without the need for NAT simplifies connectivity.
- Flat Address Space: Uniform addressing makes network policies and service discovery straightforward.
3. Understanding Kubernetes Services
Services provide stable endpoints to access a set of Pods.
- Abstraction: Decouple the frontend from the backend Pods.
- Load Balancing: Distribute traffic among healthy Pods.
- Discovery: Allow clients to find services via DNS.
3.1 Service Types Explained
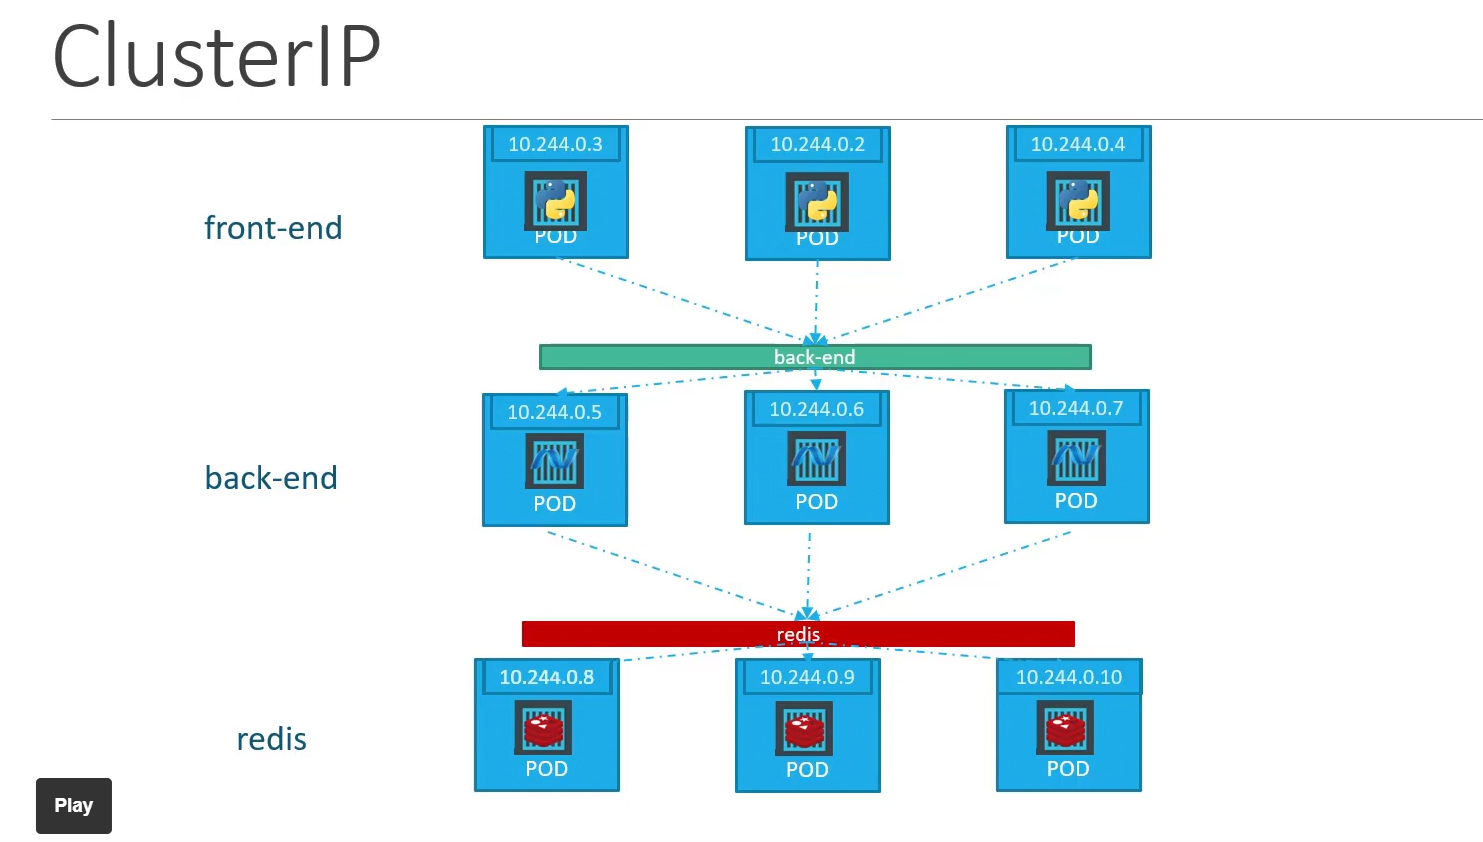
3.1.1 ClusterIP

- Default Service Type.
- Access Scope: Exposes the Service on an internal cluster IP.
- Use Case: Ideal for internal communication within the cluster.
apiVersion: v1
kind: Service
metadata:
name: my-service
spec:
selector:
app: my-app
ports:
- protocol: TCP
port: 80
targetPort: 8080
- ClusterIP Assigned: Kubernetes assigns a ClusterIP (e.g.,
10.96.0.1). - Accessing the Service: Other Pods use
my-serviceas the hostname.
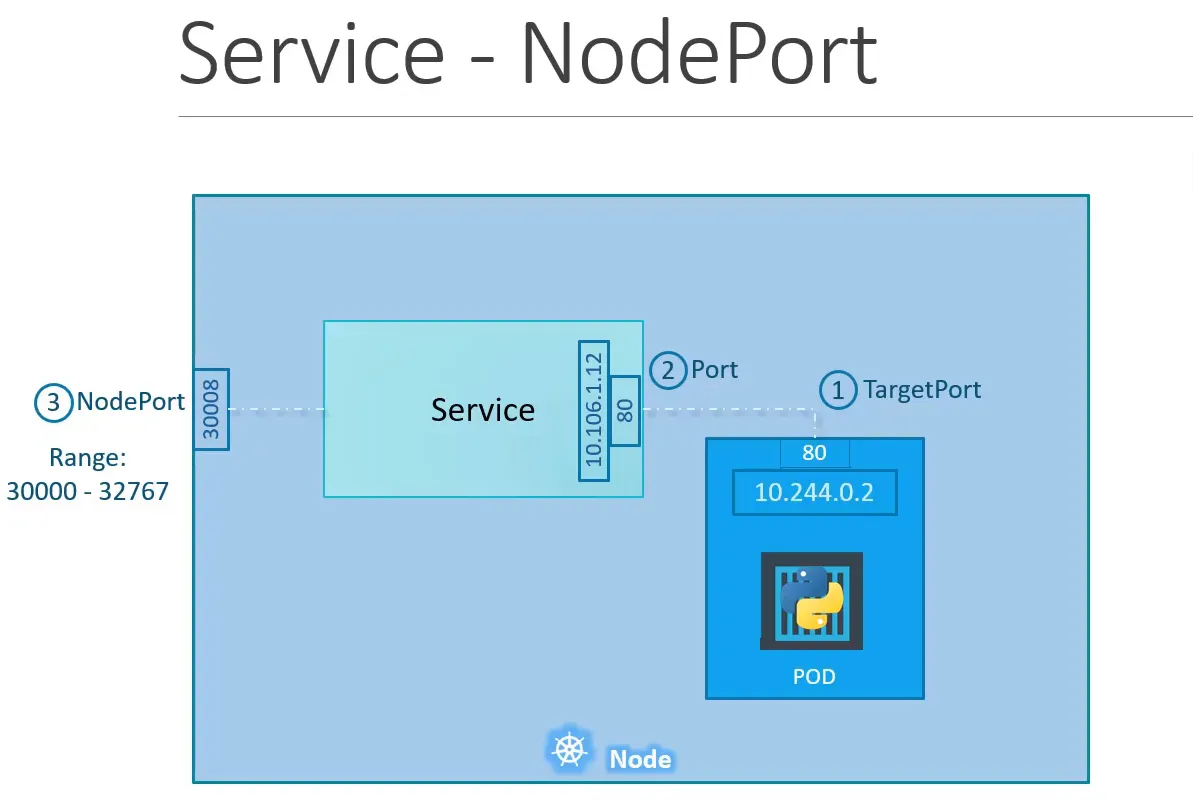
3.1.2 NodePort

- Access Scope: Exposes the Service on a static port on each Node's IP.
- Port Range: Ports between 30000 and 32767.
- Use Case: Accessing the Service from outside the cluster without a cloud provider's load balancer.
apiVersion: v1
kind: Service
metadata:
  name: my-nodeport-service
spec:
  type: NodePort
  selector:
    app: my-app
  ports:
    - protocol: TCP
      port: 80
      targetPort: 8080
      nodePort: 31000
- Accessing the Service: Use
<NodeIP>:31000from outside the cluster.
3.1.3 LoadBalancer
- Cloud Provider Integration: Provisions an external load balancer (e.g., AWS ELB, GCP Load Balancer).
- Access Scope: Exposes the Service externally with a public IP.
- Use Case: Recommended for production environments requiring external access.
apiVersion: v1
kind: Service
metadata:
  name: my-loadbalancer-service
spec:
  type: LoadBalancer
  selector:
    app: my-app
  ports:
    - protocol: TCP
      port: 80
      targetPort: 8080
- External IP Assigned: The cloud provider assigns a public IP.
- Accessing the Service: Use the external IP to reach the Service.
3.1.4 Headless Services
A headless service is a type of Kubernetes Service that does not allocate a ClusterIP. Instead, it allows direct access to the individual Pods' IPs. This is useful for applications that require direct Pod access, such as databases or stateful applications where each Pod needs to be addressed individually.
- No ClusterIP: Specify
clusterIP: Nonein the Service definition. - Direct Pod Access: Clients receive the Pod IPs directly, not the Service IP.
- Use Case: Stateful applications, databases, and when you need direct control over load balancing.
apiVersion: v1
kind: Service
metadata:
  name: my-headless-service
spec:
  clusterIP: None
  selector:
    app: my-db
  ports:
    - port: 5432
      targetPort: 5432
- Service Discovery: DNS responds with all the Pod IPs under the Service, allowing clients to connect directly to each Pod.
3.2 Service Discovery Mechanisms
3.2.1 Environment Variables
- Deprecation Warning: Relies on environment variables set at Pod creation. Not updated if the Service changes.
- Limited Use: Not suitable for dynamic environments.
3.2.2 DNS-Based Discovery
- CoreDNS: Kubernetes uses CoreDNS for internal DNS resolution.
- Naming Convention: Services are reachable at
service-name.namespace.svc.cluster.local. - Automatic Updates: DNS records are updated dynamically as Pods come and go.
4. Traffic Routing and Load Balancing
4.1 kube-proxy and Its Modes
kube-proxy is a network proxy that runs on each Node and reflects the Services defined in Kubernetes.
It runs on each node of a Kubernetes cluster. It watches Service and Endpoints (and EndpointSlices ) objects and accordingly updates the routing rules on its host nodes to allow communicating over Services.
4.1.1 Operating Modes
-
Userspace Mode (Legacy):
- How It Works: Intercepts Service traffic in userspace and forwards it to the backend Pod.
- Performance: Less efficient due to context switching between kernel and userspace.
-
iptables Mode (Default):
- How It Works: Uses
iptablesrules to route traffic directly in the kernel space. - Performance: More efficient, better scalability.
- How It Works: Uses
-
IPVS Mode:
- How It Works: Uses IP Virtual Server (IPVS) for load balancing in the Linux kernel.
- Benefits: Scales better for large numbers of Services and endpoints.
4.2 Session Affinity
Session affinity ensures that requests from a client are directed to the same Pod.
- Client IP Affinity:
- Configuration: Set
sessionAffinity: ClientIPin the Service spec. - Timeout: Controlled by
service.spec.sessionAffinityConfig.clientIP.timeoutSeconds.
- Configuration: Set
apiVersion: v1
kind: Service
metadata:
  name: my-affinity-service
spec:
  selector:
    app: my-app
  ports:
    - protocol: TCP
      port: 80
      targetPort: 8080
  sessionAffinity: ClientIP
  sessionAffinityConfig:
    clientIP:
      timeoutSeconds: 10800
- Use Case: Applications that require stateful sessions.
5. Practical Examples
5.1 Creating a Service
Let's create a Deployment and expose it with a Service.
Step 1: Create a Deployment
apiVersion: apps/v1
kind: Deployment
metadata:
  name: nginx-deployment
spec:
  replicas: 3
  selector:
    matchLabels:
      app: nginx
  template:
    metadata:
      labels:
        app: nginx
    spec:
      containers:
        - name: nginx
          image: nginx:1.17
          ports:
            - containerPort: 80
Step 2: Expose the Deployment
apiVersion: v1
kind: Service
metadata:
  name: nginx-service
spec:
  type: ClusterIP
  selector:
    app: nginx
  ports:
    - protocol: TCP
      port: 80
      targetPort: 80
Accessing the Service:
- From another Pod in the same namespace:
curl https://nginx-service - Using fully qualified domain name:
curl https://nginx-service.default.svc.cluster.local
5.2 Using a Headless Service
Headless Services can be used in combination with StatefulSets.
apiVersion: v1
kind: Service
metadata:
  name: mysql
spec:
  clusterIP: None
  selector:
    app: mysql
  ports:
    - port: 3306
      targetPort: 3306
StatefulSet Pods:
- Pods get DNS entries like
mysql-0.mysql.default.svc.cluster.local - Useful for databases that require stable network identities.
6. Conclusion
Understanding Pod and Service networking at a deeper level makes you better to design and troubleshoot applications effectively in Kubernetes.
Key Takeaways:
-
Pod Networking:
- Pods are assigned unique IPs from the cluster's Pod CIDR range.
- Containers within a Pod share the same network namespace.
-
Service Types:
- ClusterIP: For internal cluster communication.
- NodePort: Exposes Service on each Node's IP at a static port.
- LoadBalancer: Integrates with cloud providers to provide external access.
- Headless Service: No ClusterIP; clients receive Pod IPs directly.
-
Traffic Routing:
kube-proxyhandles traffic routing usingiptablesor IPVS.- Session affinity ensures consistent routing for client sessions.
-
Service Discovery:
- CoreDNS allows Pods to resolve Services by name.
- Headless Services provide direct access to Pod IPs.
You're now ready to build good, scalable applications on Kubernetes :).
In the Next Article:
We'll explore Network Security with Policies and Ingress Controllers, where we'll look at securing your cluster's network communication and managing external access to your services.